How do Telescopes Work? Your Question Answered

Telescopes have the ability to see objects from hundreds of thousands of miles away in space, but how do they work? Truth is, telescopes come in many shapes and sizes, and they range from the little plastic tube that you can buy at the toy store for $2 to the Hubble Space Telescope. On the middle end of the spectrum, you have amateur telescopes that fit in the middle, and while they are not as powerful as the Hubble, they can still accomplish incredible things like read the writing on a dime from more than 150 feet away. When it comes to the amateur telescopes of today, you have two types: a refractor telescope and a reflector telescope.

The Two Telescopes

Instead of using lenses, the reflector telescope uses mirrors while the refractor telescope uses glass lenses. They both accomplish the same thing, but they do it in different ways. To understand what makes telescopes work, first, let’s look at why you cannot see far away. For example, why can’t you read a dime from 150 feet away without a telescope? The answer is that the object does not take up enough space on your eye screen. To give an analogy, it is like how digital cameras couldn’t see the writing on a dime because it does not cover enough pixels on your retinal sensor.

Using a bigger eye, you can collect light from the object and create a bright image that will magnify the image to stretch it over more pixels on the retina. This is what lets you see further away.

The Objective Lens and the Eyepiece Lens

The objective lenses, also known as the primary mirror, will collect light from distant objects and bring the light to a point of focus. On the other hand, you have the eyepiece lens, and this takes bright light from the objective lens, and it focuses the objective lens. In other words, it spreads out and magnifies the primary mirror. Telescopes operate using the same principle that you find with a magnifying glass. In essence, the idea behind it is to collect as much light as possible to form images inside the telescope, and the light magnifies it like a glass that takes up the space on your retina.

The Ability to Collect Light

Your telescope’s light collecting capabilities relate directly to the diameter of the lens or mirror that is known as the aperture or objective lens. The aperture gathers light, and the larger your aperture, the more light that your telescope can collect and bring into focus. The more light that you have, the brighter the final image will be. How does a telescope magnify things? A telescope’s ability to magnify images will depend on the lenses and the combinations that are used. The eyepiece will perform a magnification, and that magnification can achieved with almost all telescopes.

Why Can’t the Eye See Objects at a Distance?

While human eyes do have the ability to see for long distances, most of it will appear to be a tiny point in the sky. For example, humans can see the Andromeda Galaxy, which is more than 2.5 million light years away, but even in a massive galaxy like Andromeda, it appears as a tiny point in the sky to the naked eye. As an object gets further away, the harder will be to see, but that is why telescopes have proven an invaluable tool for exploring the known universe.

Will a Bigger Lens Yield a Bigger Image?

If you want to make a distant object appear bigger and brighter, you want to collect more light. You can create a brighter image so that it takes up more space on your retina. In fact, the big lens of telescopes will collect more light than what the naked eye has the ability to collect, and this focuses the light to a point from inside the telescope. Your telescope’s ability to collect light will largely depend on the objective lens, which will gather and focus the light from a narrow portion of the sky. The performance of your telescope will depend almost entirely on the size of your objective lens, which is why you should look for a telescope with a larger objective lens.

Refracting telescopes have sometimes been seen as inferior. If you have ever watched light bend through a prism, then you know where the problem comes in at with a refracting telescope: the lens. As light passes through the glass, it will slow down, and while lenses have the shape to bend light, the amount of bending will depend on the wavelength. Understanding this, however, you can make an informed decision on the best choice for a telescope. Reflecting telescopes can be much larger, and they look deeper into space because of the design.

Reviews of the Best Thermal Imaging Cameras

Buyers looking to purchase a thermal imaging camera should consider a number of factors before making a final decision. Especially those who are not sure what they should look for, there are a

Top Thermal Imaging Cameras on the Market

number of useful tips that can help anyone make the right choice based on his or her individual needs and budget. In general, some of the factors that should go into your camera selection include built-in features, portable vs. fix mounted and whether your selection has the appropriate software needed for an application.

Although many buyers already understand thermal imaging and have an idea of which brand they may prefer, some buyers are completely new to the industry and require additional information to make the best decision possible. As far as brands go, FLIR and Fluke are the most well-known and reliable options. Each has a vast selection of cameras from which to choose.

Best Thermal Camera for Home Inspections

Extech i5 Thermal Imaging Camera

Ideal for facility maintenance and home inspections, the Extech i5 Compact Infrared Thermal Imaging Camera (seen above) is compact and fully automatic. Its ease-of-use makes it a popular choice among buyers with little or no experience using a thermal imaging device. As one of the smallest and lightest thermal cameras on the market, this powerful tool features intuitive one-handed operation. It also includes a high-resolution, 2.8-inch LCD color screen and a rechargeable lithium-ion battery.

The included QuickReport software aids in the sharing and analysis of radiometric images. In fact, each image can be organized and analyzed. The software enables users to drag and drop images, add text comments and add a company logo to inspection reports.

Additional Extech i5 Thermal Imaging Camera Features and Benefits

  • Rugged body
  • Includes a two-year limited warranty
  • Has a storage capacity of up to 5,000 images
  • Helps to quickly find problems and evaluate work

Find Problems, Evaluate Work and Schedule Repairs

Home inspectors can use the Extech i5 Thermal Imaging Camera to see things that are not readily visible to the naked eye. The camera can detect and reveal minor temperature variations that may signal moisture problems and electrical failures. In addition, the Extech i5 weighs a mere 12 ounces and easily fits in a tool kit, pocket or belt.


Best Thermal Cameras for Fire Fighters

As a firefighter, safety is key when performing essential job functions. That is why it is important for firefighters to utilize high-quality thermal imaging devices that are specifically designed for the unique working conditions of firefighting crews.

FLIR K2 TIC with MSX

The FLIR K2 TIC with MSX is a high-quality thermal imaging camera designed for ease-of-use and affordability for firefighting crews. This camera possesses all the ruggedness, capability and reliability every firefighter needs to stay safe on the job.

FLIR K2 Thermal Imaging Camera Features

  • Uses FLIR’s patented MSX technology
  • Compact and easy to attach to turnouts
  • Includes a bright LCD and intuitive interface
  • Can be used for multiple firefighting applications
  • Equipped with seven different thermal imaging modes
  • Engineered to survive tough conditions, including withstanding a 2-meter drop onto concrete

FLIR K33 & K53

The FLIR K-series is easier-to-use and more affordable than many other cameras of its kind. Without sacrificing reliability, clarity or performance, both the K33 and K53 include FLIR’s FSX™ Flexible Scene Enhancement. In addition to the camera’s ability to intensify structural and textural details in thermal images, these cameras help improve awareness in a given situation to provide firefighters with an increased sense of safety and confidence while on the job.

As the camera of choice for buyers looking for high image quality without all the extras, the K33 and K53 models both power on ready to go. Not only can this save time on the job, but also firefighters can focus on their immediate challenges rather than wasting energy setting up his or her thermal imaging device.

FLIR K33 & K53 Features

  • Includes a two-bay charging station
  • Both cameras include FSX Flexible Scene Enhancement in real-time
  • Equipped with one on/off button starts the camera in TI-Basic mode
  • Freezes an image on the K33 or captures stills and video on the K53 with the easy pull of a trigger
  • Designed for high resolution that includes the following:
    • The K33 resolution of 240 x 180 matches the resolution of the K45 cameras
    • The K53 resolution of 320 x 240 is equal to the image quality of the K55 and K65
      cameras

Additional FLIR K33 & K53 Features and Benefits

  • Comes with multiple color palettes
  • Equipped with automatic heat detection capability
  • Allows for regional adjustments that include units, date and time formats


Best Thermal Cameras for Electrical Inspections

Electrical contractors understand the importance of having the tools required to get the job done right. As a leading brand, FLIR offers a wide range of thermal imaging solutions designed to help contractors complete their work safely and efficiently. Not only can these cameras help detect problems, but they can also help electrical professionals prevent outages and shutdowns.

Accurate Temperature Measurements

In addition to revealing the specific location of heat issues, thermal imaging devices provide an accurate way to measure temperatures without requiring the contractor to touch the source of the problem. Not only does that help create a safer working environment, but it also makes the process easier and less stressful for every worker on the job.

FLIR’s selection of lightweight handheld infrared cameras comes in a variety of shapes and sizes. While some can fit easily in a tool belt, others are full-featured, high-resolution options that can help any electrical contractor gain an edge in the industry.

FLIR TG165 Spot Thermal Camera

With a spot ratio of 24 to 1, the FLIR TG165 Spot Thermal Camera can help electrical professionals discover temperature problems often missed by standard radiometers.

FLIR TG165 Spot Thermal Camera Features

  • Simple to operate
  • Fits every budget
  • Rugged and reliable
  • Targets the right spot
  • Great for HVAC inspections
  • Has a spot ratio of 24 to 1
  • Can withstand a 2-meter drop
  • Includes intuitive menu icons
  • Equipped with dual laser pointers
  • Proven to have true thermal detection
  • Made with a portable, ergonomic design
  • Comes with a tripod mount and lanyard connection
  • Created by the world leader in thermal technology
  • Stores images and data on a removable micro SD card
  • Equipped with FLIR’s exclusive Lepton® micro thermal camera
  • Has a convenient pull trigger that activates lasers and freezes images
  • Includes a mini USB port for charging the battery and downloading images

FLIR TG165 Spot Thermal Camera Benefits

  • Detects mechanical overheating
  • Designed with rugged durability
  • Aids with predictive maintenance
  • Measures temperature more accurately
  • Helps workers stay safer and more aware
  • Assists with detecting refrigeration issues
  • Helps the contractor see heat issues clearly
  • Allows the contractor to troubleshoot quickly
  • Allows for the documentation of work performed with images
  • Perfect for finding hot fuses and troubleshooting electrical issues
  • Includes a two-year product warranty with a ten-year thermal imaging detector
    warranty when registered within 60 days of purchase

FLIR TG167 Spot Thermal CameraFLIR TG167 Spot Thermal Camera

The FLIR TG167 Spot Thermal Camera closes the gap between a single spot infrared thermometer and FLIR’s other thermal camera options. With the FLIR TG167, electrical contractors can see the heat easily, which means they will know where to measure it.

TG167 Spot Thermal Camera Features

  • Grab and go simplicity
  • Has a 24:1 spot size ratio
  • Stores images and downloads data
  • Designed for the harshest environments
  • Includes FLIR’s exclusive 2-10 warranty
  • Designed for indoor electrical inspection
  • Instantly shows what is hot and where to aim
  • Includes FLIR’s Innovative Lepton® IR Imaging Engine
  • Equipped with FLIR’s exclusive Lepton® micro thermal sensor

FLIR TG167 Spot Thermal Camera Benefits

  • Rugged and reliable
  • Eliminates blind guesswork
  • Great for electrical troubleshooting
  • Built to withstand a two-meter drop
  • Compact for easy storage in a tool bag
  • Reveals the heat for accurate measuring
  • Easily saves images and data for documentation
  • Intuitive to operate with no special training required
  • Downloads images fast over USB or from removable micro SD
  • Enables a contractor to fire it up and get to work in seconds
  • Perfect for showing customers images and including in reports
  • Provides quality image detail on even small connectors and wires
  • Helps contractors easily find unseen hot and cold spots in electrical cabinets or switch boxes


Best Thermal Cameras for Leak DetectionFLIR E60 Compact Thermal Imaging Camera with 320 x 240 IR Resolution and MSX (Discontinued by Manufacturer)

FLIR E-Series and E-Series bx

Now, with MSX, FLIR’s advanced thermal imaging camera performance continues to get better with each new development. Not only can the FLIR E-Series and E-Series bx cameras enable efficient troubleshooting, but they also help leak detection professionals create detailed reports easily and share images faster.

FLIR E-Series and E-Series bx Features

  • Includes a WI-FI app
  • Includes optional lenses
  • Has an auto screen orientation
  • Includes FLIR Tools mobile app
  • Can add more measurement tools
  • Includes simple touchscreen tools
  • Can add up to three moveable spots
  • Connects to smartphones and tablets
  • Can help expedite critical decisions
  • Includes MSX thermal image enhancement
  • Allows live streaming of thermal video
  • Capable of importing radiometric JPEG’s
  • Has a dark precision touchscreen interface
  • Enables one to adjust contrast and color easily
  • Includes optional optics and full focus control
  • Equipped with FLIR E-Series Infrared Camera WI-Fi
  • Equipped to email findings directly from the field
  • Easily helps contractors package images in reports
  • Allows co-workers to watch along as leak detection occurs
  • Lets you switch between portrait and landscape view without affecting the upright
    position of the temperature measurement overlays

Additional FLIR E-Series and E-Series bx Features and Benefits of E40, E40bx, E50, E50bx, E60 & E60bx

  • Provides extra visible detail for MSX enhancement
  • Equipped with LED lamp and laser pointer for lighting dark settings and marking locations in photos
  • Higher thermal sensitivity at <0.045°C allows for easy detection of subtler temperature patterns
  • Higher temperature range (up to 650°C or 1,202°F) enables the accurate measurement of hotter-running equipment
  • Bluetooth communication sends data from MeterLink-enabled clamp and moisture meters to the camera, embedding it into thermal images

Black & Decker TLD100 Leak Detector

Although most people do not realize it, the average house has a significant amount of leakage. In fact, although heating and cooling accounts for approximately 50-percent of most people’s energy usage, their leaks and drafts can significantly increase the amount they spend on heating and cooling. That is why it is important to find a high-quality thermal leak detector like the Black & Decker TLD100.

In addition to the detector’s ability to find leaks along walls, duct work and molding, it can also provide intuitive feedback to the user when it comes to finding the right location to place insulation or caulk for best results. With this device, anyone can increase the efficiency of their home’s insulation.

Black & Decker TLD100 Thermal Leak Detector Features

  • Equipped with a red light to indicate warmer spots
  • Equipped with a blue light to indicate cooler spots
  • LCD screen displays temperatures in either Fahrenheit or Celsius on the LCD screen
  • Designed to select multiple temperature tolerances, including one, five and ten degrees

Black & Decker TLD100 Thermal Leak Detector Benefits

  • Helps identify problem areas
  • Can be used to diagnose engine misfires
  • Aids in checking for leaks around windows and doors
  • Can be used to check refrigerator and freezer settings
  • Helps uncover hidden leaks caused by insufficient insulation
  • Equipped with an easy-to-read color coding system and screen
  • Identifies weak spots that often lead to high heating and cooling costs


Best Budget Thermal Cameras

Fluke Visual Hand-Held

Created with solid technology, the Fluke Visual Hand-Held Infrared Thermometer & Imaging Camera is a quality thermal imaging thermometer and camera designed to meet a wide range of needs. Not only is this camera affordable, but it is also versatile, easy to use and made to last.

Fluke Visual Hand-Held Infrared Thermometer & Imaging Camera Features

  • Includes SD card memory
  • Able to scan between -10˚ and 250˚ Celcius
  • Equipped with a wide range of temperature detection
  • Great for the purposes of leak detection and inspection
  • Includes a degree of precision that is within several degrees in either direction

Fluke Visual Hand-Held Infrared Thermometer & Imaging Camera Benefits

  • Designed with adjustable emissivity
  • More accurate than a standard temperature gun
  • Enables blending from full visual to full thermal
  • Blends real-world imaging with the thermal detection unit
  • One of the most affordable thermal imaging thermometer camera combinations on the market

Thermal Imaging Takes on a Whole New Market

Once only used by professionals needing to detect temperature, thermal imaging is beginning to take on a whole new life. In fact, although smart phones do not currently come equipped with built-in infrared cameras, anyone can purchase an infrared camera add on for their own mobile device.


Thermal Imaging Devices for Smart PhonesFLIR ONE Thermal Imager for Android

In today’s society, most people carry their phones with them at all times. It’s no wonder that more people are finding beneficial uses for thermal imaging capabilities on their android devices.

FLIR ONE Thermal Imager for Android

A lightweight accessory designed to transform an android device into a powerful infrared camera, the FLIR ONE Thermal Imager for Android displays live thermal infrared images by using the FLIR ONE app. With the app, temperature variances can be measured, captured and shared as thermal images and videos.

FLIR ONE Thermal Imager for Android Features

  • Comes with a protective case
  • Features automatic shuttering
  • Has its own internal battery
  • Equipped with a built-in battery
  • Possesses patented MSX Technology
  • Includes a power/status indicator
  • Includes Lepton thermal camera module
  • Non-contact spot temperature measurement
  • Operating temperature: 32°F to 95°F (0°C to 35°C)
  • Scene temperature range: -4°F to 248°F (-20° to 120°C)
  • Weighs 2.75-ounces with dimensions of 2.8 x 1 x 0.7-inches
  • Comes equipped with a micro-USB connector for Android phones

FLIR ONE App Features

  • Includes a thermal time-lapse
  • Has the ability to take thermal panoramas

FLIR ONE Thermal Imager for Android Benefits

  • Easy to carry
  • Lightweight and compact
  • Offers superior image quality
  • Conserves its own battery life
  • Designed to be sleek and practical
  • Automatically switches to low-power mode when inactive
  • Lets the user know when its fully charged or running low
  • Technology that allows for no reduction in handset battery life


How They Work

When using a thermal imaging camera, the image produced is frequently called a thermogram. It is analyzed through a process called thermography. As sophisticated devices that process the captured image and display it on a screen, thermal imaging camera images can be used for a number of things. They can assist in the immediate diagnosis of a potential problem, or they can be processed through specialized software for further evaluation. Instead of providing a number for the temperature, thermal imaging cameras give you a picture that actually shows the temperature differences in an area.

What Is Thermal Imaging?

A method of improving the visibility of objects in a dark environment by detecting the objects’ infrared radiation to create an image is commonly known as thermal imaging. In addition to its ability to work in environments without any ambient light, thermal imaging can penetrate through things like fog and smoke. Most often, thermal images are gray scale in nature. However, some thermal cameras do add color to images for easy identification of objects at various temperatures. In gray scale, white objects are hot while black objects are cold. The amount of gray indicates variations between cold and hot temperatures.

Also known as, a thermographic camera or an infrared camera, this type of device is similar to a traditional camera except that thermal cameras operate in wavelengths as long as 14,000 nm rather than the 400 -700-nanometer range of typical visible light cameras.

For most people, getting the best value for the money spent is a top priority. However, depending on an individual’s specific needs and expectations, there are a number of things to look for during the search for the right camera. Some of those factors may include deciding between qualitative and quantitative cameras, deciding on specific built-in features needed for an application and whether the preferred choice is portable or fix mounted.

Qualitative vs. Quantitative

Depending on the specific application, buyers should decide which type of camera best suits his or her needs. The following is an explanation of the differences between the two:

Qualitative Measurement: Obtaining and interpreting thermal images based on thermal contrast. This helps determine the specific location of temperature variations as well as what the temperature difference is between the main target and the surrounding areas.

Quantitative Measurement: Determines the correct temperature readings of thermal images. Especially when needing to know the exact temperature of a target to determine whether it will fall in or out, the quantitative measurement is quite useful.

Built-In Features

An important factor to consider when choosing a thermal imaging camera is whether the camera has the specific built-in features needed for the particular application. The following are only a few of the many features to look for:

  • Built-in alarm
  • Messaging function
  • Image masking function
  • Digital inputs and outputs

Portable, Fix Mounted or Pan and Tilt

With a wide range of choices, thermal imaging cameras can be portable, fix mounted or pan and tilt. The good news is, with a clear understanding of the differences of each, the selection process is often simplified.

Portable Thermal Imager

Ideal for applications like research, electrical, mechanical, firefighting, building inspections, energy audits and process control, portable handheld thermal imaging cameras are typically lightweight and easy to use. Buyers should take note of the design and weight of their desired camera during the selection process. In some cases, buyers should also consider environmental protections as well as durability.

Regardless of the portable camera’s designated application, buyers should ask themselves the following questions:

  • Will the camera be used for an extended period?
  • What size lens is required for the specific application?
  • Should the camera come with specific voice annotation capabilities?
  • Does the camera battery need to hold a charge for a specific period?

Fix Mounted & Pan and Tilt

When buying a fix mounted or pan and tilt thermal imaging camera, there are a number of factors to consider as well. Buyers should ask themselves the following:

  • Should the camera remain fixed at all times?
  • Does the camera need to have the ability to pan and tilt?
  • Will the camera be exposed to outdoor environmental elements?

Look For High Resolution Options

When setting out to purchase a thermal imaging camera, it is important for buyers to understand that the majority of these cameras have fewer pixels than most visible-light cameras. For this reason, buyers should select a camera with the highest resolution and image quality possible. Understandably, smaller budgets may limit the choices for some buyers, but each buyer should still focus his or her attention on high-resolution options that fit within their own unique budget. This is important because, in thermal imaging, the higher the resolution and image quality, the more accurate the results for showing fine details.

Thermal Imaging Cameras Make Life Easier

Whether you’re a professional looking to enhance your work performance or a home owner hoping to detect problems in your own house, finding a reliable, high-quality thermal imaging camera is a key component to getting the accurate temperature measurements you deserve. Clear images can not only make filing reports easier, but they can also help you see potential problems right away.

Buyer Considerations Review

As a buyer, it is best to seek help from a knowledgeable professional if you are not sure which camera may be the right fit for your specific need and budget. However, a few things are certain; high-quality cameras will last longer and provide clearer and more accurate images. Buyers looking to purchase a thermal imaging camera should consider a wide range of factors before making their final decision. Anyone that is not sure what they should look for can benefit from the detailed information included for each camera discussed in this review. When following these tips, anyone can make the right choice based on his or her individual needs.

New to Thermal Imaging? There’s no need to worry. Although some thermal imaging camera buyers are savvy in the industry and possess a clear understanding of thermal imaging and all that it entails, many people find it useful to conduct significant research to ensure they will make an informed decision.

Keeping Workers Safe

Whether a worker is a firefighter, electrical contractor, home inspector or leak detector, there is a lot to learn about each thermal imaging device and how it can bring the most benefits to a work place. With a well-designed thermal imaging camera, firefighters can remain safe and more confident in their job, electrical contractors can rest assured that they will not have to touch hot wires and home inspectors can relax in knowing that they got the job done as thoroughly and completely as possible.

Regardless of the specific thermal imaging camera you choose, you can experience the many benefits associated with each brand and design. You may prefer a fully equipped multi-use infrared device or a compact, but powerful camera. Either way, the main point is to purchase a thermal imaging camera that is sure to give you the most benefits for your money. Taking the first step toward getting that high-quality thermal imaging camera is easy when you understand how these cameras work, and how each one could benefit you.

The Best Muzzleloader Rifle Scopes

Purchasing a scope for your muzzleloader can be one of the most important improvements you can make to it. Hunters find that they can shoot tighter groups as well as have more success when using a weapon with a scope. Scopes work well when compared to the simple mechanical sights being used alone. This is especially true when hunting at dawn or dusk when light levels are low. Scopes will also help less experienced hunters until they’ve had more practice shooting.

Regardless of one’s age or eyesight, a scope can help your shot and make your hunting experience more enjoyable, but trying to choose the right scope for your weapon can feel overwhelming. There are a lot of different types of scopes available for muzzleloaders, and each one will have specific features designed to improve your shot. With a little knowledge on the subject, you’ll be able to make a confident selection.

What to Look for When Buying a Muzzleloader Rifle Scope

The first feature you want to take note of is the eye relief. You’ll need at least three inches to avoid eyebrow knocks and cuts from heavy loads. If the stock or eye relief is too short, you won’t have a very pleasant shooting experience. You will also want to look for one with a fixed or low power. One’s with magnification levels of 4X to 6X are average for a muzzleloader, although anything from 3X to 9X works nicely for all-purpose hunting. The 6X to 12X scopes are ideal for long range shooting. Take into consideration how far you’ll be shooting. Those in wide open areas will need long distance visibility while anyone hunting in the woods will never need a visual distance of more than 150 yards.

Your budget will be a big determining factor when deciding exactly which scope to purchase. Cheaper versions often fail, and expensive ones can include more features than you will actually use. The general rule of thumb when budgeting for a scope is that it should cost about half of what your muzzleloader did. This gives you a high quality scope that matches the rifle’s level of quality. Those that come with the mounting brackets are also an exceptional deal.

The Basics

When shopping for a muzzleloader scope you will come across many terms and descriptions that you may not understand. Becoming familiar with them will allow you to pick out the perfect scope for your needs. The following is a list of some of the most commonly used terms and what they refer to.

  • The front lens gathers light. Its size is what gives the scope its field of view.
  • One inch, or 30mm, is considered the standard tube size. The rings have to match the body’s diameter.
  • Elevation and windage are adjusted by turrets, knobs, a flat blade screw driver, or your finger pressure. Those where one click makes a ¼ inch change in impact at 100 yards are standard.
  • Larger scopes may include a parallax adjustment while single power scopes have no adjustments.
  • You’ll find the eye piece and magnification adjustment at the rear of the scope as well as a possible focus knob.
  • The reticle will vary among scopes. It can be mil dots, a simple cross hair, or a set of smaller lines with a cross hair that compensates for bullet drop. Scopes with batteries light up.
  • Variable power lets you adjust your given power. 3X9X40 is standard.
  • Lens coatings will repel water and block several different wavelengths.
  • A charged scope refers to how it is filled with nitrogen gas to keep the moisture out.

The Traditions Performance Firearms Muzzleloader Hunter Series Scope

This scope is a 3-9X40 with a circle reticle and a matte black finish. The Multi-coated crystal lenses will give you increased clarity, especially in conditions with low light levels. The compact design is nitrogen filled, and it is shockproof, waterproof, and fog proof. It weighs 7.2 ounces and measures 14.8 by 3.5 by 3.5 inches. Overall, it is a very nice piece at an affordable price point.

Online reviews are favorable stating that this scope has a smooth elevation and wind age in addition to clear optics. Some were disappointed that it doesn’t come with the necessary mounting rings, but were still pleased with its performance. It is priced on the low side, and it is a practical scope with few features. That being said, it is a good value when compared to other similar designs in this price range.

The Thompson/Center Universal Muzzleloader Scope and Mount Kit

This rifle scope from Thompson/Center Arms comes with a four inch eye relief and a 36 to 12 feet field of view at 100 yards. Each shot is more accurate due to your ability to dial in on the target. The fully coated lenses offer superior clarity and are fog proof and waterproof. This makes it an ideal scope in challenging circumstances. It comes with a one inch tube and measures 12 ¼ inches long. It weighs in at 15 ½ ounces. The scope mounts and all screws are included, and they fit a weaver style base.

Online reviews describe this muzzleloader scope as very nice with high clarity. At a median price point they find it to be a fully functional scope that doesn’t break their budget. Another top notch product by Thomas Center Products, this scope mounts easily.

Truglo Tru-Brite Xtreme 3-12X44 Muzzleloader Scope

Available for a higher price point, the Tru-Brite Xtreme 3-12×44 offers many more features than the previously listed scopes. It comes with a high resolution and ultra-high contrast optical design. The illuminated, dual color reticle gives you a choice of green or red for a quicker target acquisition when lighting conditions are low. The reticle is easily calibrated with several bullet/powder combinations and offers aiming points out as far as 300 yards. It is nitrogen filled as well as fog-proof and waterproof.

The multi-coatings will give you maximum clarity, brightness, and contrast in the worst lighting conditions. You’ll find it has a rubber coated eye piece with speed focus, and a flip up, see thru lens cap. The large diameter adjustment drums are low profile, and there are elevation and windage adjustments with leaf springs. The tube is one piece constructed of aircraft quality aluminum. The entire scope has a textured, durable, matte finish that is non-reflective. It requires a 3V CR2032 lithium battery which is included, and it has a lifetime limited warranty.

Conclusion

Now that you have become familiar with some of the terms used to describe a muzzleloader rifle scope, you should be able to better understand their descriptions. This will allow you to find the best one for your rifle. If you are looking for a very basic, simple to use scope, the Traditions Performance Firearms Muzzleloader Hunter Series Scope will suit your needs perfectly. It’s a good scope at an affordable price. The Thompson/Center Universal Muzzleloader Scope is a nice middle of the road option while the Truglo Tru-Brite Xtreme 3-12X44 Muzzleloader Scope will give you plenty of features for a somewhat larger investment.

How to Choose and Buy Binoculars

Binoculars are optical instruments consisting of two small telescopes placed side-by-side. Each of the telescopes consists of lenses that bring the image being observed into excellent focus. In addition to the lenses, they are further fitted with a pair of prisms in each of the chambers. The prisms play a significant role in giving an image the proper orientation. Binocular vision finds wide applications in many areas including hunting, watching distant birds in the sky and astronomy. Also, sports lovers use binoculars to catch a good view of a sporting event from a distance.

Unlike monocular vision, which utilizes only a single telescope device to observe objects, binocular vision provides a three-dimensional view of an object. Furthermore, using binoculars will result into perfect visual acuity or simply clarity of the subject matter under focus. Working with binoculars has various advantages. The light weight and small size make them portable and easy to handle, carry and store. The user, therefore, can easily work with them comfortably with minimal strain while getting an incredible view of the object.

There are however various brands of binoculars in the market today; it can be confusing to make a proper choice of binoculars. When shopping for binoculars, an in-depth knowledge of the functionality and the anatomy of the device is significant. Other than that, one has to understand their needs so as to choose a perfect binocular that will meet your needs. Consider when, where and how you to use your instrument. What criteria then should be taken into consideration when shopping for a binocular instrument? Well, there are various vital aspects that anybody interested in buying a binocular has to consider. Some of the most important factors include:

1. Get to know the numbers

Binoculars are identified by unique numbers assigned to them. Each binocular is referred to with numbers like 7×35 or 10×50. Each of this numbers represents a given attribute, the number appearing before the × accounts for the magnification factor or simply the power. The 7×35 lenses make the object seven times closer while the 10×50 will cause the object appear ten times closer. The second value, on the other hand, defines the diameter of the objective lenses in millimeters. 7×35 lenses, therefore, have a diameter of 35 millimeters or 1.38 inches. The 10×50 lenses, on the other hand, have a diameter of 50 millimeters or 1.97 inches.

When you divide the second value by the first value, you get the exit pupil value. It refers to the diameter of the light beam reaching your eye in millimeters. A larger magnification results in a dimmer and larger image. Consequently, your field of view will be narrow hence making it harder to keep the picture in focus. Binoculars with a more than 10× magnification require a tripod socket for mounting. It is important in making your binoculars steady. If a larger field of view is desired, then choosing a binocular of a lower magnification would be appropriate.

In astronomical activities and hunting at dawn or dusk, a binocular with a larger objective lens is the most suitable one; this lens gather more light making them best for low light intensity activities. The larger the exit pupil value, the more light that enters and reaches your eyes. Ordinarily the human eye dilates between 2 to 7 millimeters depending on the amount of light available. Therefore, go for the exit value that matches your eyes dilation value.

2. Check the Lenses

Binoculars often have two types of lenses, those made of glass and those made of plastic. Most binoculars, however, have glass lenses. Glass lenses, however, are expensive, but give quality images. However, a set of plastic lenses that will give the same image quality as glass lenses is even more costly.

Despite giving high-quality images, glass lenses have one disadvantage; they reflect back part of the light. This problem, however, can be rectified by giving the glass the right coating. Lenses coats are often described by certain codes; they include C, FC, and MC. Code C means only some parts of the lens has been covered with a single layer. Code MC means some lens surfaces are coated with various layers. While FC, on the other hand, means all the lens surfaces are coated with several layers.

Multiple coating is the best but; this increases the cost of the binoculars. Plastic lenses are known to give poor quality images and greatly rugged than the glass type. However, they find perfect application where durability is significant such mountain climbing.

3. Access the eyepieces

It is recommended that the eyepiece lenses should be placed in a good comfortable distance from your eyes. For those wearing glasses, they should even be placed further from them. This is referred to us eye relief and mostly ranges from 5 to 20 millimeters and 14 to 15 millimeters or greater when wearing glasses. Many of the binoculars have rubber eyecups around the eye pieces; this will help you set the eyepieces over the eyes when using them. Binoculars with eye cups that retractor flips out of the way are best for those people wearing glasses.

4. Test its ability to focusing

Testing the focusing ability is important when choosing binoculars. Check how close you can focus the binoculars and determine the distance between it and the object you are focusing. Most binoculars have two focusing mechanisms: most have a center-post mechanism and a diopter corrector. It allows one of your eyes to be more strong or weaker than the other. Waterproof binoculars, on the other hand, have individual focusing abilities for different lenses and controls on each eyepiece. Some binoculars, however, have no focusing ability; they can’t adjust their focus beyond the preset focus. This type causes eyestrain should you try to focus on something closer than the preset distance.

5. Check the prism design

A good binocular should have their main lenses spaced wider than the eyepieces this is because of the Porro prisms that are used. It has the advantage of making the binoculars larger and making near objects appear more 3- dimensional. Binoculars using roof prisms let the lenses rest in line with the eyepieces. This makes the binoculars more compact, however, these compromises with image equality. Roof prisms, however, can be made to deliver quality images; this, however, comes at a greater cost. Less expensive binoculars utilize BK-7 prisms, these squares one side of the image. More expensive binoculars utilize BAK-4 prisms. These types of prisms deliver more light, sharper and rounder images.

6. Consider the best weight for your binocular

Binoculars having a high magnification and wide lenses weigh more than the standard binoculars. This can, however, be fixed by using a tripod or a strap, which allows you carry them around. However, if you are involved in long distances traveling you may be forced to settle for a less powerful, but lighter one to make your movement easy.

7. Consider waterproof vs. water resistivity

The environment from which you conduct your activities determines the kind of binoculars you will purchase. Water resistant binoculars are useful in wet conditions; if you are operating in wet environments waterproof binoculars could just be perfect for you. It will be helpful in avoiding damages that may lead to an added cost of buying another binocular.

8. Consider the manufacturers reputation

Reviews other optical objects manufactured by manufacturers and level of confidence that the customers have in that manufacturers. Also, consider the period the manufacturer has been in the business. Additionally, find information on their how they handle matters relating to damage or malfunction of their devices.

9. Armoring

A good binocular should have a well-armored body. This will help protect it from physical harm due to bangs, bumps, and destructive element.

10. Gas filled

It is equally healthy to have binoculars filled with nitrogen gas; this is useful in preventing interior condensation. It happens when binoculars are moved from a warm environment to cold environment or vice versa. It causes condensation in internal optics fogging them up. Additionally, mold can even form over time from repeated condensation. Hence most weatherproofed optics is gas filled, though not always.

11. Price

Before settling on a specific binocular model, it is wise to do a comparative analysis of the prices from different outlets dealing with the same item to ensure you settle on not the only quality product, but also, cost friendly as well. Getting the right binoculars, therefore, is a combination of various factors, define your needs well that will set a precedence to shop for the right binoculars. Additionally, proper care and maintenance is the key to ensuring that your binoculars function properly and more efficiently. Binoculars are very stable optical instruments; they rarely get extensive damage. However, you may encounter a few problems like broken lenses caused by a shock, double imaging caused by collimation, getting ideal binoculars lies with, make a perfect choice depending on your needs. Taking the right steps before getting a binoculars from a shop is essential.

Now that you’re armed with the knowledge on how to best buy a pair of binoculars, check out our guide to this year’s best binoculars to get some ideas for great pairs that will meet your needs.

Binocular Magnification and Aperture Explained

Binoculars are used for everything from birdwatching to getting a closer look at lunar surfaces. There are many manufacturers of binoculars, and their quality can vary greatly from one brand to the next as well as from one model to the next. Before understanding the finer points of the best optical elements and coatings suited for specific uses, it is important to understand binocular magnification and aperture to determine which type is needed for the jobs the binoculars will be expected to perform.

Binocular Numbers

Two numbers are used to designate the power of binoculars. They are written with the letter “X” in between them. The number before the X is related to magnification. It is the number of times closer an object will appear in the field of view of the binoculars as opposed to viewing it with the naked eye. The second number is the aperture measured in millimeters. This refers to the width of what is called the objective lens. It is the big lens of binoculars and is important for capturing light coming from objects. Both work together to produce binoculars that are suited for tasks such as watching a sporting event or sky-watching at night.

Binocular Magnification

There is more to choosing the magnification power of binoculars than just picking the largest number before the X. A 7X magnification power means that an object viewed through the binoculars appears seven times closer. As the magnification increases, the field of view decreases. Magnification can get to be unwieldy in keeping viewed objects steady in the viewfinder. At larger magnifications, a tripod or other steady mount is needed just to keep objects from bouncing around when they are viewed. The slightest movement at high magnification powers results in large movements of an object being viewed through binoculars. A compromise must be made between being able to easily hold an object in view and getting the desired object close enough to be examined or identified.

Binocular Aperture

The aperture is the width of the front, or objective lens, of binoculars, measured in millimeters. Wider lenses have greatly increased total surface area. This is important for gathering the light that makes objects viewable, especially in dim light. Larger lenses can bring in more light to strike the ocular magnification lenses. These are the lenses one looks through when using binoculars. Bigger aperture objective lenses need bigger binocular housings, but larger binoculars do not mean more magnification power. Larger binocular apertures are needed for viewing objects in dim light. This could be game animals at dawn or dusk, or celestial objects throughout the night sky. At the same magnification, a larger aperture makes objects brighter when viewed through binoculars.

Field of View

As magnification increases, the field of view diminishes. Imagine viewing the 50-yard line of a football field from the bleachers to help understand field of view. As the magnification increases, the yard lines toward each goal post would disappear from the field of view when fixed on the 50-yard line. Increasing magnification brings objects on the field closer, but the area around the object being viewed gets smaller and smaller. High magnification can make distant objects appear much closer, but there must be a compromise depending on intended use. Binoculars with magnification that can get in close and tight to identify a small animal may be useless when glassing larger areas to identify landmarks or for search and rescue.

Balancing Magnification and Aperture

An important part in making a choice for what type of binoculars to buy is to decide what they will be used to view. It may be impossible to find one pair of binoculars that are suitable for all viewing occasions. Foe example, it would be a disappointment to attempt a bird-watching hike with a pair of binoculars of large aperture and high magnification normally used to view dim night sky objects. The binoculars would be too heavy to hold for long viewing periods in the field. Also, high magnification would make it difficult to find and track birds in trees. On the other hand, field binoculars that are recommended for birding do not have the light gathering capabilities needed to view faint galaxies in the night sky.

Variable Magnification Binoculars

Photography buffs know the value of prime lenses over variable (zoom) lenses. Prime lenses are of a fixed focal length. Zoom lenses can have their magnification changed at the turn of a dial or the press of a button. However, a certain degree of optical clarity and sharpness are compromised with variable focal length lenses. The same goes for binoculars that have variable magnification. Also, just as in photographic lenses, variable power binoculars can be much more expensive, especially for superior quality glass elements used in their construction. It may be better to buy two or more binoculars of a fixed power and aperture than to get one inferior variable power pair of binoculars.

It is important for those interested in purchasing the best pair of binoculars to consider what they will be used for. The service they will be put into is a great help in determining the appropriate magnification power and aperture size. More magnification and bigger apertures are not always the best. A pair of 7X20 binoculars can fit in a backpack or glove compartment. An 8×20 would increase magnification, keeping the binoculars the same general size. Increasing the aperture to an 8X42 size would make them much larger and heavier with no increase in magnification, but they would present a brighter image. Looking at the binocular size choices used by experts in birding, astronomy, hunting or whatever field the binoculars will be used in is helpful.

What is Eye Relief?

The term “eye relief” can be somewhat confusing due to its unusual construction but it is one of the most important factors to consider when purchasing any kind of optics such as binoculars, spotting scopes, microscopes or telescopes. The simple definition of eye relief is an exact measurement of distance between the limit of the eyepiece and where the user can still see the complete picture of what is being magnified in the scope or binoculars.

Imagine that a pair of binoculars has two cups where the eyes can be placed. Should the user pull their face backward from that point, the distance where the full image can still be viewed is the eye relief.

How Eye Relief Is Measured

Although all modern rifle scopes, binoculars and sporting optic instruments have the eye relief provided by the manufacturer, it is important to understand how this critical distance is calculated.

All scopes and sporting optics work by magnifying light through the use of a lens or a series of lenses. In effect, incoming light is channeled and refracted into a cone of light. The cone of light rays that pass through the eye piece is officially known as the exit pupil, a term normally reserved for photography but also applicable when it comes to scopes and binoculars. Effectively, the measurement of the exit pupil is usually described in either inches or millimeters, referring to the diameter of the cone of light that could can reach the eye of the user of the instrument.

Due to the way modern scopes and binoculars are constructed, the exit pupil diameter is often deliberately designed to be larger than the user’s pupil. In effect, there is more of an image being channeled through the lenses than the eye can comfortable take in with one glance. This is a deliberate engineering strategy to allow for the user to move slightly to the side of the eye piece without losing any visual information, a term known in the business as vignetting or clipping. The eye relief is therefore the distance from the eyepiece that the entire image can be viewed in its entirety, and rarely matches the same measurements for the exit pupil.

To use a practical example, a binocular rated at 10 by 52 refers to an internal series of lenses that can magnify a given visual image by ten times with an exit pupil of 52 millimeters with no magnification being employed. Should the binoculars be used at full power (i.e. at 10 times power) then the exit pupil then becomes subsequently smaller, in this case 10 times smaller, therefore just 5.2 millimeters.

The eye relief is therefore calculated to determine the maximum amount of distance the eyes of the user can be from the scope or binoculars when used at its most powerful magnification and still retail a full image as focused through the lens(es).

Why Eye Relief Matters

Whether purchasing a rifle scope, a spotting scope, or binoculars, it is not always feasible or comfortable to place the eyes directly on the instrument. Instead, it may be advantageous to pull the face back from making direct contact with the instrument. Although this may be more comfortable or desirable, it is still essential to be able to get a full view of what the instrument is magnifying or if the user’s eyes move slightly to the left or right of the eyepiece.

Individuals wearing eyeglasses, goggles, or other forms of eye wear may find it uncomfortable or impractical to place the lenses of their goggles or glasses directly on the sporting optic device. Hunters and sharpshooters using a scope on a rifle may have practical reasons to keep their faces a short distance away from the eyepiece in order to avoid damage from recoil. Going by the informal nickname of “idiot cut”, it is definitely possible to sustain a laceration around the eye if the shooter presses their face too close to a weapon when it is fired.

What to Look For In Terms of Eye Relief When Buying Sporting Optics

The simplest way to understand eye relief when first using a scope or binoculars is that the larger the eye relief, the better. While this maxim is not always true under all circumstances, it is essential to always review the manufacturer’s information on eye relief before purchasing a piece of sporting optics.

For professional sportsmen and hunters, the eye relief becomes a critical factor especially when using the optics for large-scale magnification. Hunters and sportsmen who wear glasses or wish to wear goggles must be especially careful to make sure that they have a sufficiently large eye relief to still be able to see the entire image without risking damage to either the lenses of their glasses or goggles or to the skin and area around their eyes.

Many professional sporting optical devices have built-in eye relief adjustment mechanisms. Usually designed for wearers of corrective lenses, a rotating eye cup can be adjusted to provide additional eye relief.

Reviews of the Best Night Vision Monoculars

Good night vision is something that we humans lack. As such, we must supplement our lack of night vision with tools. This technology may seem to be only of use to those in certain professions such as law enforcement or the military. However, there are many other situations in which night vision can be helpful.

When camping out in the woods, night time movement is sometimes required. While flashlights can be used, they only serve to illuminate the path in front of you. Having night vision would make it easier to identify what’s around you and where you can safely walk. The same is true for those who like to spend time looking at nocturnal animals.

Those who like to hunt or fish at night will appreciate the advantages of having night vision when trying to spot the prey and when trying to navigate in the dark. Search and rescue teams working hard to find someone in the dark will find it much easier to navigate both by foot and by boat. Finally, those involved in security details (both professional and community) will find night vision the perfect accessory to enable them to clearly see potential dangers.

DEFINITION

Although there are many tools available that offer night vision, this document will focus specifically on the use of night vision monoculars. To define a night vision monocular we can clearly say that it is a tool that offers a single eye piece and a single objective. That description may be confusing so just think of cutting a pair of binoculars in half and you’ll get the idea.

That said, do not be confused. Binoculars serve to magnify the image we see. Night vision monoculars do not magnify the image. Instead, their goal is to provide an image of area and its objects at night. Most monoculars are lightweight and small. The most basic models are held in the hand, but the more advanced models can be mounted on a variety of objects. A definite advantage to using night vision monoculars as opposed to goggles is that one eye will always be adjusted to the regular lighting conditions found in the area. Another advantage is that the exposed eye maintains its peripheral vision. The downside of a monocular device is that is does not provide any depth perception.

METHODS

When creating an image of an object at night, we humans rely on two main methods. These methods are thermal imaging and light amplification (I² technology). Each method functions in a different way and creates a different end result.

We’ll start by looking at thermal imaging. Devices that use thermal imaging are basically seeing and measuring the amount of heat that is emitted by people, animals or objects in a given area. These devices are not optical (i.e. no eye piece), but instead use a sensor called a microbalometer to read the difference in heat between an object and its environment. This data is then displayed on a screen in an image called a thermogram for the user to see. No light is required. This technology is sometimes referred to as FLIR (Forward Looking Infrared).

Light amplification (I² technology) is different. It does not see or read heat. Instead, it takes the amount of light available and amplifies it. By enhancing the amount of light, this device can provide a clearer image of objects at night. Simply put, this device takes the existing amount of light and magnifies it. This is done via an image intensifier tube. In the most basic models, light packets (photons) are captured on a photocathode plate, magnified and then sent down a tube to create the final image. In more advanced models, the light packets are enhanced even further by the use of a second plate called the microchannel plate.

No matter which model you choose, all light-amplification devices need light to function. This light can be already existing in the environment and simply manipulated by the device or an additional infrared light source can be added to assist the device. Most of the time, the image created will feature the colors of green and black. These colors were chosen because they give the highest amount of detail. However, some devices will offer black and white images. Although these images do not have as much detail, they are definitely not as bright and therefore a bit easier on the eye to use.

One other factor that affects I² technology is something called blooming. This term refers to the whiteout or temporary blindness that can occur when a bright light enters the field of vision. New technology known as Auto-Gating can reduce blooming and its disruption of vision. This technology was originally only found on the most advanced models, but can now be found on some of the mid-level devices as well.

JUDGING QUALITY

When it comes to a thermal imaging device, consumers should consider one main factor. That factor is resolution. Basic devices will provide a decent image with only 240 x 180 pixels per square inch. Mid-level devices offer a resolution of 320 x 240 pixels. For hand-held devices, look for a resolution of 640 x 480 pixels. Note that when you increase the number of pixels, the price will also increase. Other high-quality features to look for include the ability to capture both still and video images.

Determining the quality of an I² technology device is not quite as cut and dry. First, one must consider the different generations of this product. Each generation (1 – 3) offers different technology and quality. That said, most of the time, the quality of an I² product is determined by its image intensifier tube. The resolution of an I² device is measured in lines per millimeter (lp / lpm). Most feel that 45 lpm will suffice for average situations. However, many people prefer a resolution between 64 to 72 lpm. One word of caution applies here. Don’t think that you can purchase a device with a cheap eyepiece and objective and just add a high-quality image intensifier tube to get a great product at a cheap price. To get the best quality, you will need to have high-quality parts in the entire device.

MAINTENANCE AND CARE

If you have a thermal system, the only rule is to not drop it. With an I² technology, the same advice applies. However, there are additional actions that should be taken to preserve the life of the device. Use a protective case when the device is not in use and be sure to remove the batteries before storing it. Lens covers should be kept in place until you are ready to use the device. Consider adding a protective layer to your optical pieces. A glass filter will help to protect the actual lens from damage and dirt.

OTHER OPTIONS

You can purchase a device that combines both thermal imaging and I² technology. However, these devices are very expensive and quite often highly sought after by the military. Thus finding one will be challenging at best. A new night vision technology is developing. This uses digital technology to provide an image. Functioning much like a digital camera, this device uses CCD chips and CMOS chips to gather light to create an image. In contrast to a standard I² technology device, these digital versions are cheaper and more compatible with cameras. They are also not damaged when exposed to bright light. That said, their level of performance is really on par with a basic I² model, but it is improving quickly.

GENERATIONS

FLIR (Forward Looking Infrared) devices, otherwise known as thermal imaging, are sometimes referred to as having generations. However, those terms are often used only in a military setting or in relation to the products produced by a company that uses the name FLIR. As such, there is no specific set of standards that determines the generations of actual FLIR technology for civilian use.

I² technology, on the other hand, has a very clear set of standards to delineate its different generations. The first generation, known as Gen 1, is the simplest type of night vision available. It offers technology from the 1960s and as such is the least costly option. Being Gen 1 means that the device only has a photocathode plate and a basic image intensifier tube.

GEN 1

Gen 1 devices need ambient lighting as least as strong as a full moon to function or they must be equipped with an IR illuminator to provide the necessary light. While adding this infrared light can increase the ability of a Gen 1 device to see in darker areas, it also means that the user is now visible to other night vision device users. Furthermore, these add-on IR illuminators are often quite limited in their power. Due to this, images are often not as bright and have a lower resolution.

Users can detect a human-size object located approximately 75 to 100 yards away using a Gen 1 device. Being able to clearly recognize what that object is requires a closer distance of 50 to 75 yards. Obviously, objects smaller than a human will require even closer distances in both the detection and recognition ranges.

Furthermore, Gen 1 devices are very susceptible to blooming. This image distortion caused by bright lights can make it impossible to see at times. The field of view on a Gen 1 device is also distorted with somewhat of a fish-eye feel on the outer third of the lens.

The device will provide about 1500 hours of use before any parts need to be replaced and Gen 1 devices are usually not mountable on any external device such as a hat or weapon. In addition, Gen 1 devices have a shorter battery life and require a few seconds to turn on and off. Nevertheless, they are often perfect for those who are considered hobbyists.

When purchasing a Gen 1 device, consumers should know that the following factors can affect performance: intensifier tube, size of objective, magnification level and the use of an IR illuminator. Consumers may see the term Gen 1+ as being of higher quality. However, that term simply denotes that the device is made using a currently produced intensifier tube, not necessarily a higher-quality one.

GEN 2

Second generation night vision devices (known as Gen 2) definitely cost more money than the Gen 1 options. However, for that money, you also get a better product. First, Gen 2 devices are much smaller than Gen 1 devices. That is due to an improvement in the plate technology. Second, Gen 2 devices have a second plate, called a microchannel plate, that further amplifies the movement of the light packets. With the addition of this second plate, the images from a Gen 2 device have better resolution and therefore are much cleaner and brighter.

The technology is still a bit old as it is from the 1970s, however Gen 2 devices require less ambient light and do not need the addition of an IR illuminator. The improved technology means that users can detection a human-size object from about 200 yards away and recognize that object from just about 100 yards away.

Other improvements include no fish-eye distortion and less blooming (distortion due to bright lights). Furthermore, a Gen 2 device has a longer battery life and can be mounted on a variety of objects. A Gen 2 image intensifier tube will usually provide about 5000 hours of use before needing to be replaced. Some sites will refer to a Gen 2+ device. Such devices were created when the Russians took our Gen 2 technology, copied it and then improved it.

As with the Gen 1 devices, the most important factor is still the type and grade of image intensifier tube that is used. Nevertheless, good quality lens are also a must for reliable performance. Some Gen 2 devices have also been improved with the addition of the Auto-Gating technology to virtually eliminate blooming.

GEN 3

In keeping with the old saying “You get what you pay for.”, purchasing a Gen 3 device will cost you money. However, you will also receive quite a bit of quality and technology for the cost. Using technology developed in the 1990s, these devices offer more than 10,000 hours of night vision before needing to be replaced. They use gallium arsenide in their image intensifier tubes. This product is expensive, but it also provides the highest degrees of brightness and accuracy in night vision images.

It functions very well in areas of low-light and does not need an additional IR illuminator. In fact, it operates well in all light conditions. Because of this, it is almost impossible to be detected by another night vision device user. With Auto-Gating technology included, a Gen 3 device has almost zero blooming and no image distortion.

It offers both detection and recognition ranges of approximately 300 yards depending on the model chosen and the conditions in which it is used. Gen 3 devices are extremely versatile and can be mounted on almost any product. In addition, there are plenty of accessories to add to the device to improve its function or compatibility even further. For all of these reasons, Gen 3 devices are preferred and used by the military. In fact, they are so good that they are not allowed to be exported outside the United States.

Sometime the rating of Gen 3+ is used. This is the very highest quality of Gen 3 available. Some people would like to call it Gen 4, but that category has not yet been given permission to officially exist. Trying to define a Gen 3+ is a bit difficult. In the past, it meant that the device had Auto-Gating. However, now most Gen 3 devices and some Gen 2 devices have that technology. One thing that still sets Gen 3+ devices apart from other Gen 3 devices is the lack of (or a greatly reduced) ion barrier. Ion barriers prevent the movement of electrons. Gen 3+ devices can operate with a much higher sensitivity to light compared to Gen 3 devices.

In Gen 3, as with the other generations, the type and grade of image intensifier tube used has the greatest impact. Those tubes that meet military standards are often referred to as “Mil-spec.” Some tubes fail to meet “Mil-spec” and as such are categorized as “Commercial.” In the “Commercial” grade, there are two divisions. Grade A means that the device has missed achieving “Mil-spec” in one standard. Grade B devices have missed meeting “Mil-spec” in several standards. No matter which type you choose, remember that the resolution offered is still the best predictor of image quality.

BEST OPTIONS

There are many companies that product night vision monoculars. Here is a list of some of the top manufacturers.

  • ATN
  • Armasight
  • Bering Optics
  • Bushnell
  • Firefield
  • Luna Optics
  • Night Optics
  • Night Owl Optics
  • Pulsar
  • SightMark
  • US Night Vision

BEST OVERALL MONOCULAR
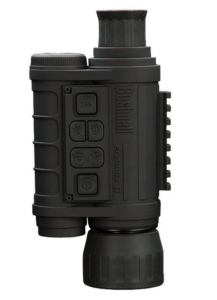
Bushnell Equinox Z DigitalDigital Gen 1 products are becoming popular because they provide the quality of a Gen 2 device at the cost of a Gen 1 product. For this reason, our top pick is the Bushnell Equinox Z Digital. This product offers a 1-3x magnification and a 50 mm lens. Its viewing range is just about 984 feet and it comes with a infrared illuminator. It also comes with additional features such as image capture, video recording, daytime color and the ability to be mounted on a tripod. It features glass objectives, an adjustable IR brightness control and comes with a carrying case.

BEST NIGHT VISION MONOCULAR FOR THE MONEY

For the cost, the Bushnell Night Watch with Built in Infrared Monocular is a great option. This Gen 1 device has a scope that offers 2x magnification. It also comes with a rubber-armored grip and a built-in tripod mount. These last two features are somewhat unusual for a Gen 1 product. Rather than having to add an IR illuminator, this device comes with one already built-in. Its has a viewing range of 5-400 and is compact enough to slip into your bag. It comes with its own case and a lanyard for easy carrying.

BEST NIGHT VISION MONOCULAR UNDER $1000
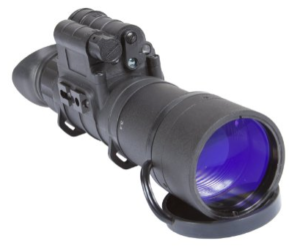
Armasight Avenger Gen 2+ QSGetting a Gen 3 device for under $1,000 is almost unheard of. For that reason, we’ve chosen to recommend a Gen 2+ device instead. The Armasight Avenger Gen 2+ QS Quick Silver White Phosphor Night Vision Monocular provides advanced technology at a reasonably affordable price point. What makes this product a Gen 2+ is the ability to add high-performance Image Intensifier Tubes (IITs) using either Green Phosphor or Quick Silver. In addition to being able to enhance the product, this device can also be mounted on an object or carried as a hand-held device.As a standard Gen 2, it offers the resolution of 45 – 51 lpm and gives a magnification of 3x. Its lens is a wide 5 mm and it comes with automatic brightness control, automatic shut-off and a bright light cut-off system. It is water and fog resistant and can be adapted for use with cameras.

BEST NIGHT VISION MONOCULAR UNDER $500

Finding a Gen 2 under $500 is difficult, too. That’s why we’ve recommend a Gen 1+ instead. The Pulsar Challenger GS Super 1+ 3.5 x 50 offers lots of features that users will find helpful. First, it has a clear image that is free from any distortion across the entire field of view. Its Image Intensifier Tube is a CF-Super type that works with high-quality lens to accomplish this. It also has built-in magnification of 3.5x. The body of this device is completely sealed so that it can operate in virtually any weather condition. Like our previous pick, this device also has a built-in IR illuminator. However, it also offers a second mounting point to attach additional IR illuminators as needed. This Gen 2 device provides users with a few different compatibility options for use with helmets and googles. It comes with a power switch to prevent accidental powering. This device has a detection range of up to 750 feet and a lens of 50 mm. It comes with a carrying case and a built-in tripod socket for mounting.

BEST NIGHT VISION MONOCULAR UNDER $200
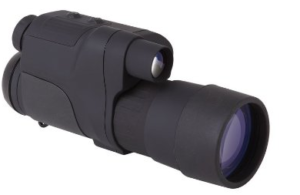
Firefield FF24063 Night Vision MonocularThe Firefield FF24063 4 x 50 mm Night Vision Monocular is definitely only a Gen 1 product. That said, for its price, it offers ample features. First, its lens is a full 50 mm and it offers a magnification of 4x. Its detection range is just under 360 feet and it has an integrated IR illuminator. Despite being just a Gen 1 device, this product comes with a tripod mount at its base. The Firefield 4 x 50 mm is also quite durable and can withstand a wide range of temperatures. Its images are clear thanks to its high resolution and it comes with a carrying case and a lens cloth.

GENERATIONS

Rather than select only one product for each generation, we have decided to show you a few of the options available. This will allow you to get a feel for what’s out there as well as see the differences and similarities in the various products.

BEST GEN 1 NIGHT VISION MONOCULAR

#1 Sightmark 4×50 Gen 1 Eclipse Night Vision

The Sightmark Eclipse also uses digital technology. However it still manages to provide quite a bit of night vision. It has the benefit of delivering current black and white images rather than the old standard of green and black images. Its objective is 5 mm and it offers a magnification of 4x. It comes with its own carrying case and a lens cover.

#2 Night Owl Xgen 2.1x Digital Night Vision

The Night Owl Xgen also uses digital technology to increase the power of this Gen 1 device. Its magnification is 2x and the IR illuminator helps to provide clear images. This device features 5 different settings that are controlled via a single button making it very easy to use in the field. Nevertheless, it does not offer all of the features found in our #1 product.

BEST GEN 2 NIGHT VISION MONOCULAR

#1 Night Optics D-300 Generation 2+ Standard Night Vision

This Night Optics product provides a slew of features. It has a multi-stage IR illuminator that is high power, low battery and infrared indicators, and optics that meet Mil spec standards. Its body is very durable and can withstand any type of weather. Its mounts allow users to attach it to anything from weapons to headgear and it comes with a hard carrying case.

#2 Armasight Avenger Gen 2+ ID Improved Definition

The Armasight Avenger gives users a magnification of 3x and has a resolution of 45 – 51 lpm. It offers automatic brightness controls and an automatic shut-off system. Its infrared illuminator is built-in and comes with a flood lens. The lens itself is 50 mm and provides a clear range of focus. This device is also water and fog resistant so that it can be used in a variety of weather scenarios. The Armasight Avenger can be used as a hand-held device or mounted on another object as needed. It is also compatible for use with a camera or video recorder. To make it a Gen 2+ product, it can be fitted with Gen 2+ image intensifier tubes using either Green Phosphor or Quick Silver.

#3 ATN Night Spirit-2 Gen 2+ Night Vision

The ATN Night Spirit is a strong Gen 2 product that has a magnification of 3x and a 50 mm lens that has been coated with Proshield for protection. Its field of view is 18 degrees and it comes with the extra features of automatic brightness control and bright light shut off. Its IR illuminator and battery both come with indicators for ease in use. This device is both camera and video recorder adaptable and can be operated via a single switch knob. It offers weather resistant construction and can operate from -40 to + 50 degrees Celsius. Its resolution is between 40 and 45 lpm providing clear images. Mounting options allow this product to be attached to head gear or a helmet.

BEST GEN 3 NIGHT VISION MONOCULAR
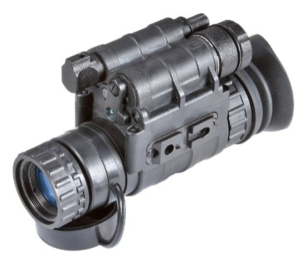
Armasight NYX-14 Alpha MGBy the time you get into the Gen 3 products, the price tag has soared through the roof. Be prepared to spend more than one thousand dollars to own a Gen 3 device. As stated, Gen 3 devices tend to be used mostly by law enforcement and the military. Nevertheless, they are available for civilian use in some cases. Consumers should note that some Gen 3 products come with restrictions in purchase.

#1 Armasight OPMOD PVS-14 Gen 3 Alpha Night Vision

The Armasight OPMOD offers an image intensifier tube with high performance manual gain. Its resolution is 64 -72 lpm and its lens provides a full 40 degrees of field of view. Its magnification is only 1x, but with such a powerful device more magnification is not really needed. This Gen 3 product comes with all of the automatic controls and indicators available as well as a built-in IR illuminator. It can operate in extreme temperatures from -51 to +49 Celsius. It is waterproof and meets the Mil Spec standard 810. Mounting options include helmet, head, weapons, tripod, camera and video recorder. It can also function as a hand-held device when needed.

#2 Armasight Nyx14-3-Alpha MG Gen 3 Multi-Purpose Night Vision

For those that wish for a Gen 3 with more magnification options, the Armasight Nyx14-3-Alpha MG offers a good product. It provides just as high a resolution (64-72 lpm) as our other recommended Gen 3 product, but it comes with the option to add 3x, 5x, and 8x magnification. Its lens is only 27 mm, but it offers a full 40 degrees in the field of view. Both the built-in IR illuminator and the battery come with indicators that show in the field of view. This product also has desired automatic features such brightness control, bright light and shut-off. It is waterproof and surpasses Mil Spec 810. This means that this product can be used in virtually any weather condition. Accessories provide options for mounting on various devices.

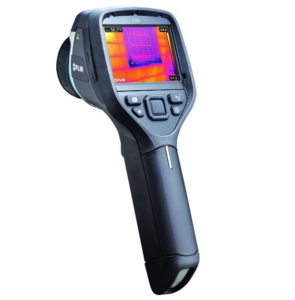
How to Clean Binoculars and their Lenses

Keeping your binoculars clean helps them last longer, and doing it properly ensures you have clear images.

The first thing you should do before cleaning your binoculars is look at the user manual. They often have recommendations for what tools to use or what chemicals to avoid on your lenses. Binocular lenses have different coatings, and manufacturers will know what chemicals harm the coating on your lenses.

After checking the user manual, there are four steps you can follow to clean your binoculars.

1: Brush dirt and dust off the lenses

One very important thing to remember is never rub dirt or dust off your lenses. Rubbing dirt off will cause microscopic scratches on your lenses. You won’t be able to see those scratches, but they scatter light. Over time that will add up to make your image cloudy. You may be tempted to use a soft microfiber cloth to clean the dust, but even that will rub the dust on the lens to create scratches.

Holding the binoculars upside down, use a lens cleaning pen with a soft brush or canned air from an office store to brush the dust off. If you use canned air, be sure to use short bursts of the air. The drastic temperature changes can cause damage to the lens. Don’t breathe or huff on your lens to remove dust. The water particles in your breath will spot your lens and possibly make it more dirty than before.

2: Use a cotton swab moistened with water or lens cleaning solution to wipe away any remaining grime.

Never use window or glasses cleaner on your binocular lenses. They contain chemicals that can damage the coating on your lenses. Don’t pour the lens cleaning solution directly on the lens. It can seep through the edges and cause damage inside the binoculars. If you have waterproof binoculars, you can run the lens directly under tap water. Be sure to use a light stream with less pressure. Remember to take care with damp binoculars. Don’t store them until they’re dry, and don’t put caps over damp lenses.

3: Use a soft, lent-free cotton cloth, microfiber cloth, or special lens tissue to wipe away smudges.

Never use a paper towel or face tissue. They’re made of woody particles that are too rough on your lens and will scratch it. Don’t use your shirt or other clothing you wear either. Those can be too rough or have dirt and dust on them. Make sure to store your cleaning cloth in a safe container where it won’t get dust or other substances on it.

Be gentle and don’t apply pressure when touching the lenses. You can put a little lens cleaner on the cloth if the smudge is still refusing to come off. Wipe in circular motions from the middle outward.

4: After you’ve cleaned your lenses, you can wipe down the body of your binoculars with a soft cloth to remove dirt or other grime. If you have removable eye cups, be sure to take them off to wipe them.

Don’t dismantle your binoculars when cleaning them. You may ruin the optic alignment. If there is something on the inside of your binoculars, take them to a professional.

Don’t touch your lenses with your fingers. Not only may your fingers be dirty, the natural oils on them could break down the coating on your lens.

Cleaning your binoculars is very important to keep them in good shape, but if you over-clean them, you may damage them. Only clean your lenses when there is something on them.

Digiscoping Basics

Digiscoping is a photography technique that occurs when a camera and a spotting scope are used in tandem to capture long-distance pictures. This method involves placing the lens of a digital camera or smartphone to the eyepiece of a spotting scope in order to take pictures at a greater distance than the camera allows. It is especially popular among bird watchers and other nature enthusiasts because it allows for close up pictures to be taken without disturbing the animal. Digiscoping is also becoming popular with backyard astronomers to get photographs of the moon. Malaysian photographer Lawrence Poh pioneered the technique and is considered the father of digiscoping, while French birdwatcher Alain Fossè is credited with coining the term ‘digiscoping.’

The surge in popularity can be attributed to the fact that the equipment is generally inexpensive and the technique can be self-learned even by novice photographers. The coupling of the spotting scope and camera allows for distance photography to be possible without the necessity of long, heavy and often expensive telephoto lenses. It also allows users to use affordable cameras to achieve high-quality results. As a bonus, the gear needed is light-weight and easy to set up.

Equipment Needed

The basic equipment setup consists of a camera, a spotting scope, a tripod and of course a subject. The camera can either be a traditional point-and-click or can simply be the standard feature of a smartphone. When choosing a point-and-click camera, there are still a few features to consider for superior outcomes. Cameras with shorter lens extensions tend to perform better than models with longer lenses. Optical zooms should fall in x4 or x5. The camera should also have a good sensor and manually adjustable settings such as aperture and ISO. Keep in mind that the greater number of megapixels a camera has and the higher quality the optics, the better the pictures will be.

While most standard scopes can be used, those with high quality optical systems will produce the best results. Consider models with high definition optical and extra-low dispersions. The extra magnification used in digiscoping pulls in not only the object of the picture, it also pulls in small movements of the equipment caused by the photographer’s shaking or from the wind. This makes a quality tripod an important tool. The tripod should be designed to work with the spotting scope and should be sturdy. Weights can be used on the tripod to keep it balanced.

Once all the gear is in order all that is left is to find a subject to shoot. Gardens make a great starting point when learning the craft. Novices may find it helpful to start by shooting objects such as flowers or shrubbery first, then move on to animals once comfortable with the process.

The Technique

Digiscoping is achieved by connecting the camera lens to the spotting scope eyepiece. This can be done in a variety of ways. Smartphones can be held in place simply by placing a finger between the phone and the spotting scope eyepiece. This will help to keep the camera lens steady and at the correct distance from the eyepiece. This technique needs a steady hand. Users should also be careful of the alignment of the lenses and the distance between them in order to keep out shadows.

There are a few options with traditional point-and-click cameras. One possibility is to manually hold the camera lens up to the spotting scope eyepiece. Just like with a smartphone, this method takes a steady hand and a lot of practice to find the optimal distance between camera and scope. For those who have difficulty with this technique, there are adapters available that will connect the camera to the scope. These adapters come in both a universal model and in models specially made to work with the different cameras available. Those specifically designed to fit the camera being used will tend to work better and will result in higher quality pictures than those taken with a universal adapter. The most important thing to look at when choosing an adapter is whether or not the camera that will be mounted has a filter thread on the lens. Adapters for these types of cameras consist of a collar that attached to the spotting scope eyepiece and an adapter plate that screws onto the filter thread on the camera. If the camera does not have a filter thread or if using a camcorder, the adapter will still have the collar to attach to the spotting scope, but instead of an adapter plate, it will have a bracket designed to support the weight of the camera or camcorder. This plate can adjust to align the axis of both eyepieces at the appropriate location. After the camera and spotting scope are lined up, it’s time to snap away.

Tips and Tricks

The only way to perfect the art of digiscoping is to log hours of practice. Some will pick it up easily; others may need some time to master the techniques involved. Here are some tips and tricks to help make that practice useful.

  • When working with new equipment, pack the user’s manual with the rest of the gear. This way, if any questions arise about usage, the answer can be found while still out in the field.
  • Bring along extra batteries, power packs and memory cards. Phones and cameras tend to use battery life up quickly and the last thing a photographer wants is to run out of storage space when the perfect shot appears.
  • Remember that the shot does not need to be centered to be great. Consider placing the subject off to the side of the shot to allow for the inclusion of scenery.
  • When zooming in on a subject, leave the scope at the minimum zoom and zoom in using the camera. This will let in the most natural light.
  • Invest in good imaging software to edit pictures after they are taken. This allows for corrections with lighting and focus.

What is Field of View?

Field of view is the extent or the range of your visual area. In terms of optics, it is widest dimension an object is visible through the eyepiece of a scope or binocular. Binoculars are the most common form of optics purchased for sporting activities. It is important to choose the right features in a binocular for your activity. Field of view is an important factor when making that decision.

Field of view, or FOV, is expressed in two ways. It is either expressed as the width in feet at 1,000 yards or in degrees of field. When the field of view is expressed in feet, it is called the linear field of view. When it is shown in degrees, it is referred to as angular. It is simple to convert one measurement to the other. The linear field of view is measured in feet at 1,000 yards. One angular degree is equal to 52.5 feet. Once the angular field of view, or degrees, is known, multiply that figure by 52.5. In most cases, the field of view is often indicated in degrees on the outside of the binoculars. For example, if the angular field of view is six degrees, then multiply 6 by 52.5, for a total of 315 feet at 1,000 yards, or a linear field of view of 315 feet. Similarly, if the linear field of view is known, divide that number by 52.5 to obtain the angular field.

The term real field of view refers to angle of the visual field which can be seen without moving the binoculars. It is measured from a central point on the objective lens. A higher value will translate to a wider visual field. The term apparent field of view refers to the angle of the magnified view. A large apparent field of view will provide a wide field of view even at a higher magnification. Optics with a wide field of view will make it easier to follow moving objects.

Binoculars display two numbers. The first number, followed by an X, is the magnification. It is the degree by which an object will appear larger. Binoculars are manufactured in a range of magnification, but lower magnification binoculars, such as 5x to 8x, are the most popular and typically offer a wider field of view. Higher magnifications, 10x and above, are available for long distance viewing, but generally have a narrower field of view.

The second two-digit number is the aperture. This is the diameter of the objective lens measured in millimeters. The size of the objective lens determines the light gathering capability of the binocular. The greater the light gathering capability, the brighter an object will appear. However, the size of the objective lens will affect the physical size of the binocular. A larger lens diameter will mean a larger and heavier binocular.

The field of view, in addition to the magnification and aperture size, are important considerations when looking to purchase an optic. Binoculars with a wide field of view are popular for bird watching, wildlife watching, or sporting events, as it is easier to follow objects that move quickly. A general purpose binocular, such as 7×35 or 8×42, would be a good choice for these activities. Lightweight enough to carry hiking, these binoculars have a wide FOV yet are powerful enough to distinguish detail. However, if you intend to bird watch or wildlife watch near wet, marshy areas or in wet weather conditions, you may want to be sure that the binoculars you purchase are waterproof and nitrogen or argon purged for fog proofing.

In choosing binoculars for astronomy, the aperture will be an important specification. For this activity, a binocular such as 7×50 or 10×50 is preferred. The 10x magnification will aid in viewing the planets, but a larger aperture will be important in dim and low light conditions. A larger aperture and greater light gathering ability will provide better resolution and allow you to study the planets in better detail. Binoculars with magnifications of 16×70 or 20×80 will benefit from being mounted on a tripod for steady viewing.

For boating activities, the marine binocular traditionally purchased is the 7×50. The 7x magnification allows a wide field of view and makes steady viewing easier with the movement of the water. The 50mm lens offers color and detail when viewing the horizon. When choosing a binocular for hunting, a lower magnification, such as 7x or 8x, provides a wide field of view to scan fields and tree lines. A 42 or 50mm objective lens would be a good choice for low light conditions, as a hunter might expect game to be more active at dawn or nightfall.

Optics will open you to a variety of scenery and wildlife, but understanding the field of view and other features will aid in purchasing an optic that is right for you.